Claim listings
Let business owners claim and verify their listings on your directory
What is claim listings?
Claim Listings allows visitors to request ownership of a listing in your directory. Once a claim is approved, the listing is marked as verified, building trust with your audience and giving business owners a way to manage their presence.
- Verified badges - Claimed listings display a "Verified Owner" badge on cards and detail pages
- Claim form - A built-in form is automatically created for collecting claim requests
- Admin review - All claims require admin approval before a listing is marked as verified
- Paid claims - Optionally charge a fee to claim a listing via a payment link
- Owner access - Verified owners can edit their listing and, if enabled in settings, view leads shared with them
- Spam protection - Built-in honeypot protection on the claim form
- Email notifications - Claimants are notified when their claim is approved or rejected
- Block builder support - Add a "Claim Listing" call-to-action block to detail pages
Enabling claim listings
- Open the edit page of your directory
- Click
Claim Listingsin the sidebar - Toggle Enable Claim Listings to on
- Configure your settings (see below)
- Click
Save
Settings
Configure how claim listings appears on your directory:
| Setting | Description |
|---|---|
| Show badge on cards | Display a "Verified Owner" badge on listing cards throughout your directory. Only shown on claimed listings. |
| Show badge on detail page | Display a "Verified Owner" badge next to the listing title on detail pages. |
| Show CTA below title | Display a call-to-action banner below the listing title, inviting visitors to claim unclaimed listings. |
| Claimed badge text | The text shown on the verified badge. Default: "Verified Owner". |
| Unclaimed badge text | The text shown on unclaimed listing badges (detail page only). Default: "Unclaimed". Clicking the badge expands the claim CTA. |
| CTA heading | The heading text for the claim CTA. Default: "Is this your business?". |
| CTA description | The description text for the claim CTA. Default: "Claim this listing to update your information and manage leads". |
| Share leads with owner | When enabled, verified listing owners can view leads (form submissions) associated with their listing. |
How claiming works
Here's what happens when a visitor claims a listing:
- The visitor opens a listing detail page
- They see a "Claim This Listing" button (either below the title or in a CTA block)
- Clicking the button opens a modal with the claim form
- They fill in their details and submit the form
- A claim request is created with a Pending status
- You receive an email notification about the new claim
- While the claim is pending, the listing shows "Claim under review" instead of the button
- You review the claim and approve or reject it (or send a payment link if paid claims are enabled)
- If approved, the listing is marked as claimed and displays a "Verified Owner" badge
- The claimant receives an email notification about the decision
Verified badges
Once a listing is claimed and approved, a verified badge appears on the listing. You can control where badges are shown:
- Listing cards - A small badge appears on cards in search results, category pages, and the homepage. Only shown on verified/claimed listings.
- Detail page - A badge appears next to the listing title. Unclaimed listings can optionally show an "Unclaimed" badge that users can click to expand the claim CTA.
Badge text is fully customisable in the claim listing settings.
Claim CTA below title
When enabled, a collapsible banner appears below the listing title on unclaimed listing pages. The banner starts collapsed showing only the heading text, and expands on hover or click to reveal the full CTA with description and button.

- Only shown on unclaimed listings
- Starts collapsed to keep the page clean - expands on first interaction
- If a claim is already pending, shows "Claim under review" instead of the button
- Hidden once a listing is claimed
- Customise the heading and description in settings
Claim Listing CTA block
In addition to the built-in CTA below the title, you can add a Claim Listing CTA block to listing detail pages using the block builder. This gives you more control over placement and styling.
Adding the block
- Open a listing detail page template in the block builder
- Add a new
Claim Listing CTAblock - Customise the title, description, and button label
The block automatically adapts to the listing's claim status - hiding when claimed and showing "Claim under review" when a pending claim exists.
The claim form
When you enable claim listings, a built-in claim form is automatically created. This form works exactly like any other form in the form builder:
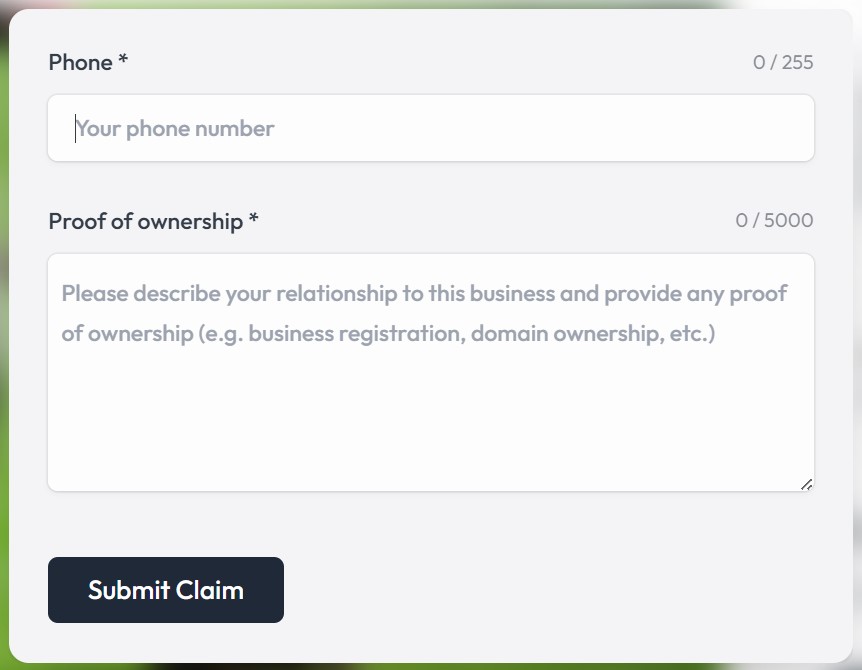
- Fully customisable fields - add, remove, or reorder as needed
- Marked as "Built-in" in your forms list
- Submissions appear in the Forms > Submissions section
- Includes honeypot spam protection
The claim form is separate from your contact form. You can customise it specifically for collecting the information you need to verify claim requests (e.g., business registration number, proof of ownership).
Paid claims
You can charge a fee to claim a listing by creating a Claim Listing product. When a product is active, admins can send payment links to claimants from the claims management page.
Setting up paid claims
- Go to Monetization > Products
- Click
Add Productand select Claim Listing as the product type - Set the price and save
- Sync the product to your payment provider
See Managing products for more details on creating and syncing products.
Sending a payment link
- Open the Claims page
- Find a pending claim and click the Send Payment Link button
- Review the email - the recipient address, subject, and body are pre-filled from your settings but can be edited per claim
- Click
Previewto see the rendered email, thenSend

The claim status changes to Payment Pending. You can resend the payment link if needed.
What happens after payment
When the claimant completes payment on the checkout page, the claim is automatically approved - the listing is marked as claimed and the "Verified Owner" badge is applied.
Payment email template
Customise the default email sent with payment links in your Claim Listings settings. The template supports placeholder tokens:
{name}- The claimant's name{listing}- The listing title{link}- The checkout URL
The default template can be overridden per claim when sending the payment link.
Checkout page
The checkout page shows the listing being claimed, the payment form (Stripe or PayPal), and - if lead sharing is enabled - a leads upsell showing how many leads are waiting. This helps drive conversions by highlighting the value of claiming.

Reviewing claims
All claim requests require admin approval (unless auto-approved via payment). Claims can be managed from the Claims sub-page under Claim Listings in your directory dashboard.
Accessing the claims page
- Open the edit page of your directory
- Click
Claim Listingsin the sidebar - Click
Claimsin the sub-menu
The sidebar shows a badge with the number of pending claims so you can quickly see how many need attention.
Claims table
The claims page displays all claims in a table with the following columns:
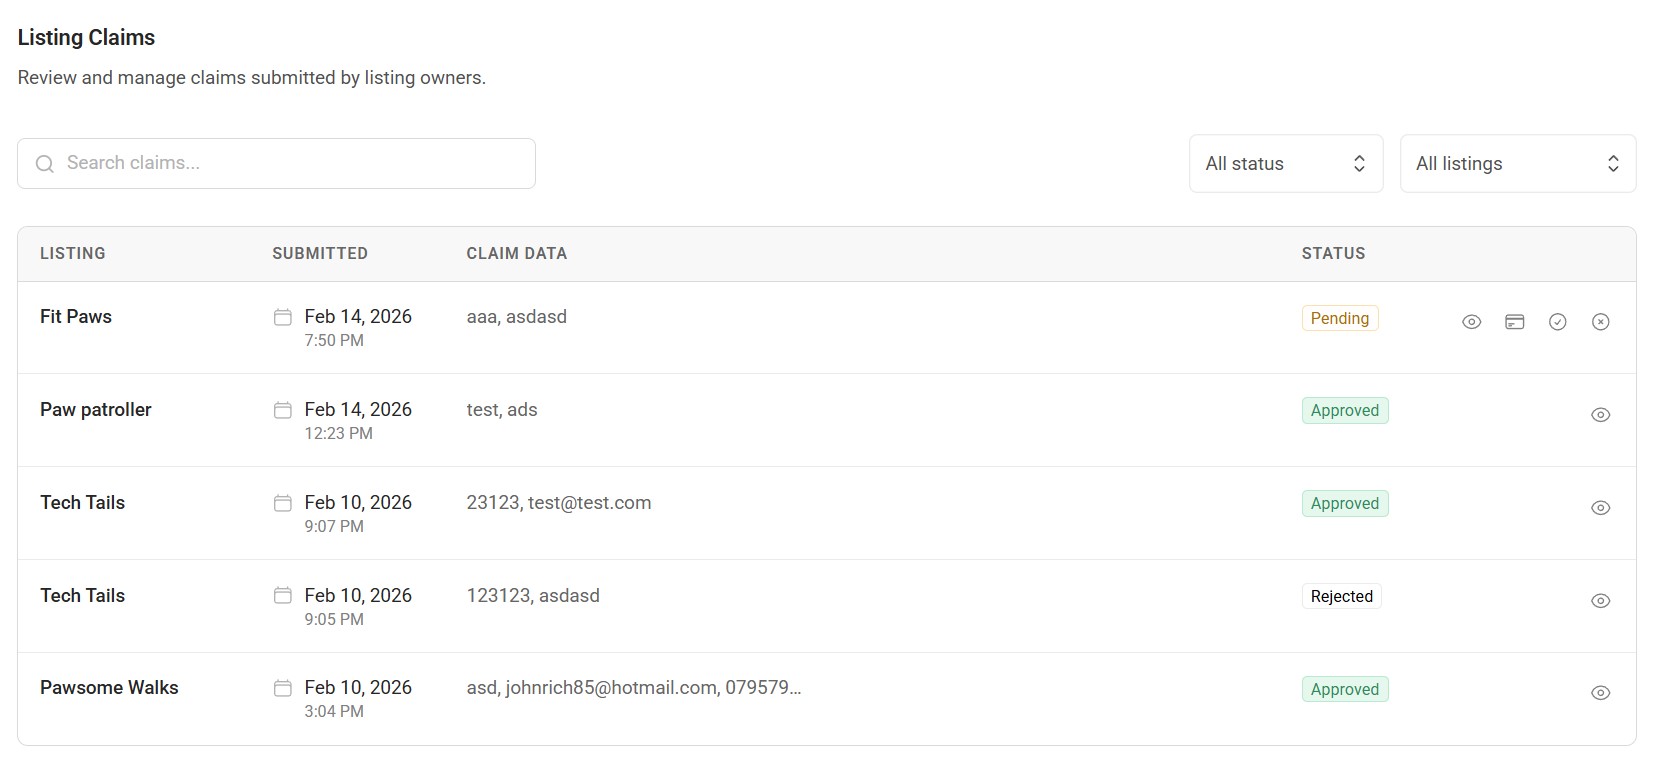
- Listing - The listing being claimed
- Submitted - When the claim was submitted
- Claim Data - A preview of the submitted form data
- Status - Pending, Payment Pending, Approved, or Rejected
- Actions - View details, approve, reject, or send payment link
Filtering claims
Use the filter bar to narrow down claims:
- Search - Search by listing name, submission data, or admin notes
- Status - Filter by Pending, Payment Pending, Approved, or Rejected
- Listing - Filter by a specific listing
Approving a claim
- Click the approve button (tick icon) on a pending claim
- Optionally add admin notes explaining your decision
- Click
Approveto confirm
When a claim is approved:
- The listing is marked as claimed and displays the "Verified Owner" badge
- Any other pending claims for the same listing are automatically rejected
- The claimant receives an approval email notification
Rejecting a claim
- Click the reject button (cross icon) on a pending claim
- Optionally add admin notes explaining the reason
- Click
Rejectto confirm
The claimant receives a rejection email notification. Rejected claims remain visible in the claims table for your records. The visitor may submit a new claim in the future.
Manually assigning a listing
You can assign a listing to a user directly without them going through the public claim flow. This is useful when you want to grant ownership to a known business owner straight away.
- Open the Claims page
- Click the Manually assign listing button
- Select a listing from the searchable dropdown (already-owned listings show the current owner's name in brackets)
- Select a user from the searchable dropdown
- Optionally add admin notes
- Click
Assign Listing
This creates an approved claim record immediately — the listing is marked as claimed, the user receives an approval notification, and any other pending claims for that listing are automatically rejected.
Claim statuses
| Status | Description |
|---|---|
| Pending | Awaiting your review. The listing shows "Claim under review" to visitors. |
| Payment Pending | A payment link has been sent. Awaiting payment from the claimant. You can resend the link if needed. |
| Approved | Claim accepted (manually or via payment). The listing displays a "Verified Owner" badge. |
| Rejected | Claim denied. The visitor can submit a new claim. |
Verified owner features
Once a claim is approved, the listing owner gets access to additional features:
Editing their listing
Verified owners can edit their claimed listing from the My Listings page in their account. Claimed listings appear alongside any submitted listings and are marked with a "Claimed" badge.
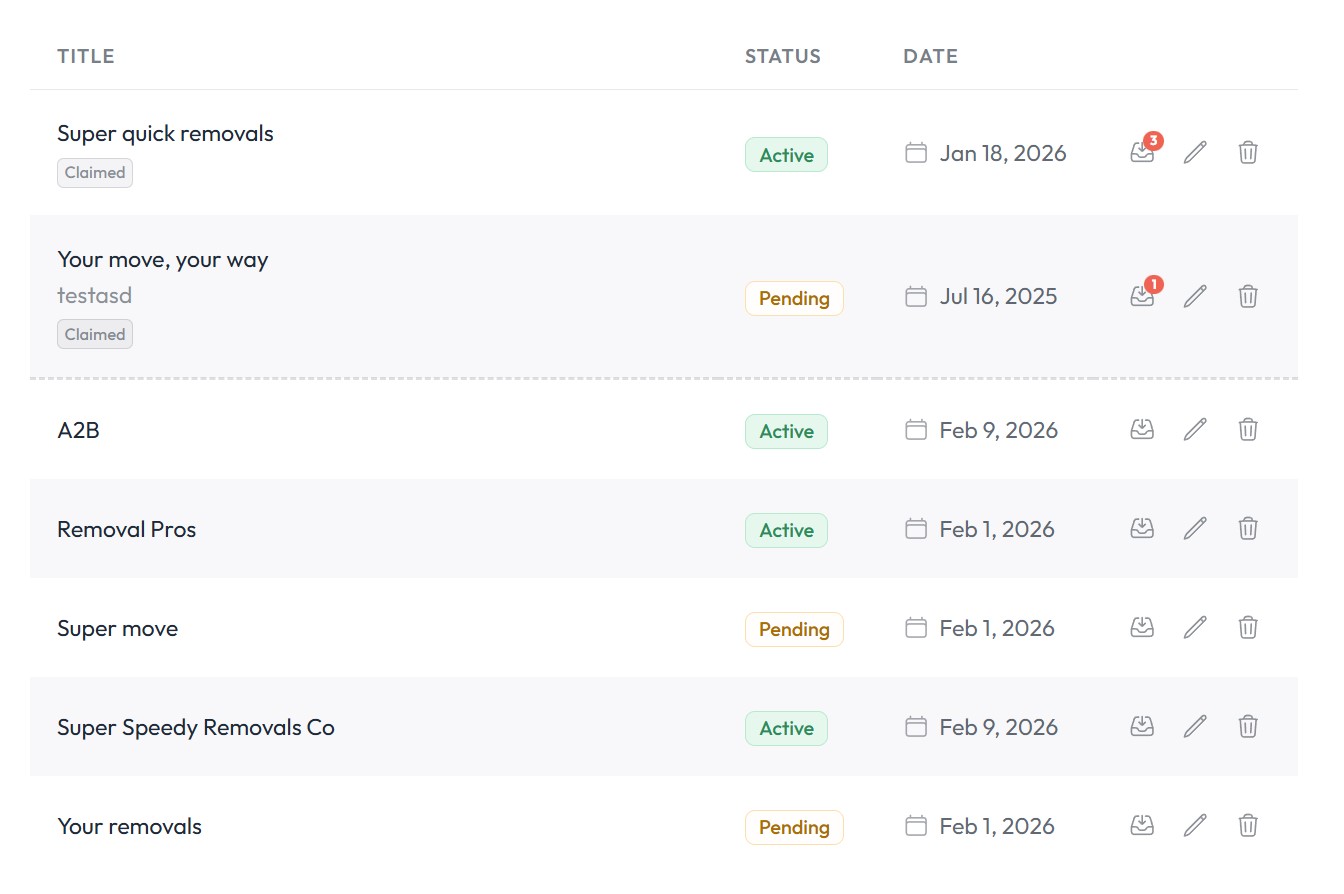
Viewing leads
If Share leads with owner is enabled in your settings, verified owners can view form submissions (leads) associated with their listing. A "Leads" link appears in the actions column of their My Listings page.

Related guides
- Forms - Create and manage forms
- Submissions & Leads - View, filter, and export form submissions
- Products - Create and manage payment products including Claim Listing
- Monetization settings - Configure payment providers